
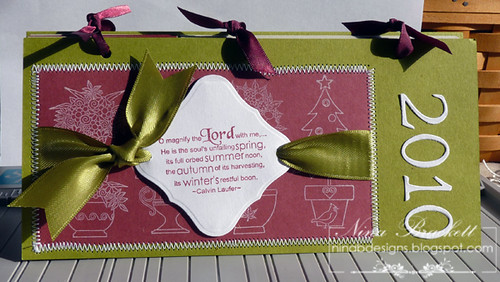
Lord of the Season is a perfect set to make handmade desk calendars with because each season is represented with a topiary image. I made about 50 handmade calendars last year and I think i might do it again this year. First is one that I will make for hostesses or dear friends and family, who enjoy handmade gifts. It takes about an hour to make, so this may not be ideal for mass production.
Long Desk Calendar. I used Green Apple, Cranberry Tart, Soft Sand, PL White cardstocks. You really need to use good quality, thick cardstock for the covers, so the calendar can sit well on your desk, especially when you put a lot of embellishments on it. Click on the photos for a larger view.
 Look how well it stands with GinaK's Green Apple for covers.
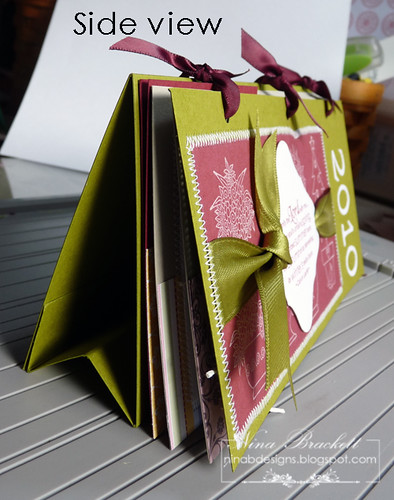
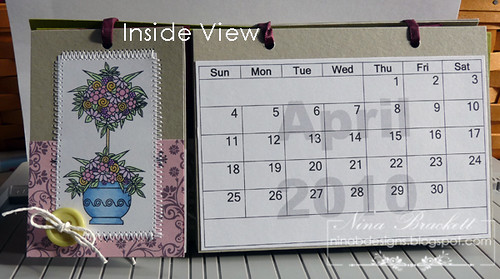 And the rest of the stamped images inside:
The patterned papers I used are digital papers from GinaK Designs: Bug Me Anytime Pastel, Vintage Holly, and Grungy Elegance packs. I colored the images with Copics and stitched around. A simple stringed button embellished each one.
In order to make this, I created a Calendar Template that you can download >>>Calendar Template HERE<<<. And you can download the tutorial on how I made this >>>Calendar Tutorial HERE<<<.
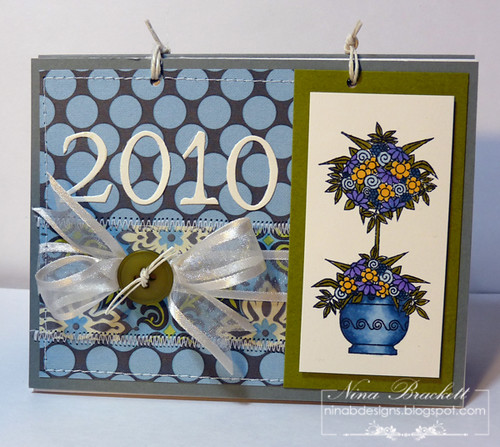
Desk Calendar for Mass Production. I designed the second calendar so you can make a few in an hour. This also uses the Calendar Template. The tutorial on how I made this is found towards the end of this post. Not only is this super easy to make, it is also economical. It uses 1 sheet heavy weight cardstock ($0.30), 3 sheets of layering weight paper ($0.62), string, ribbon ($0.25), button and scraps of paper. The total amounts to less than $2 a piece and the result is beautiful and lovingly handmade by you. Click on the photos for a larger view.
 Please scroll below to read how I made this calendar.
If you make either calendar, please leave me a comment so I can see. And if you want to have a chance to win this set, leave a comment at Gina's blog.
For even more ideas with my Lord of the Season stamp set, visit the blog links below, as well as the GinaK Idea Center here: Lord of the Season.
GinaK Designer's joining in on the hop tonight:
Carolyn King
Cathy Tidwell
Donna Baker
Erika Martin
Jessica Fick
Emily Giovanni
Lee Murphy
Melanie Muenchinger
Cathy Tidwell
Donna Baker
Erika Martin
Jessica Fick
Emily Giovanni
Lee Murphy
Melanie Muenchinger
September's Center Stage Spotlight Team:
Finally, my talented Guest DT and friends:
------------------------------------
Desk Calendar for Mass Production Tutorial: Click on the photos for a larger view.
1. Download, print and cut in quarters the Calendar Template.
 2. Cut the full sheet of heavy weight cardstock in half and cut one of the halves in half, as shown. I used Moonlit Fog.
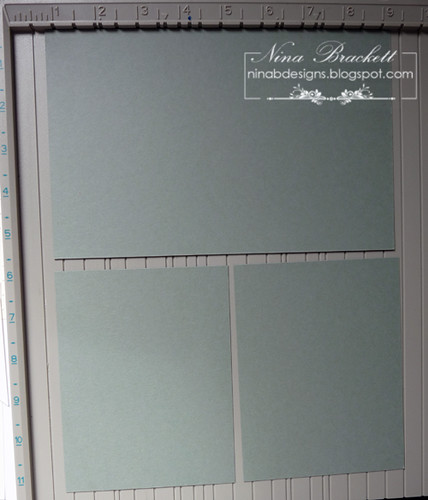 3. Score the half cardstock at the 4.25" mark and one of the quarter panels at 2.125," then fold. My ScorPal comes in handy for this step.
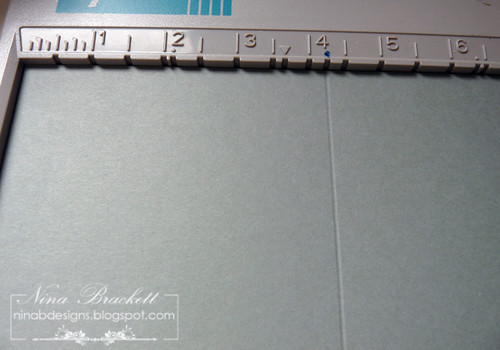
 4. Put strong adhesive on the edges of the folded half sheet. I used Scor tape.
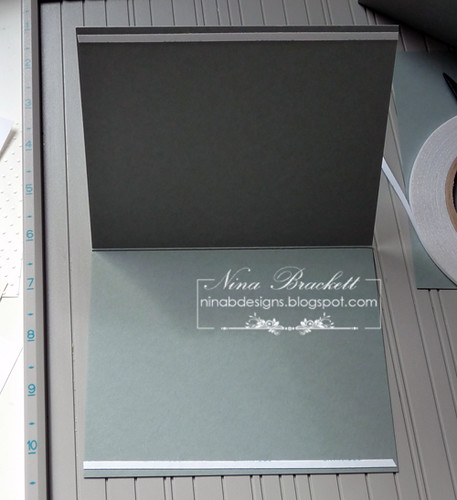 5. Adhere both folded panels as shown.
 This is what you should have now.
 6. Now, you're ready to decorate the front panel. You can make this as elaborate or as simple as you'd like. I stamped my topiary and colored it with Copics. I found scraps of paper and used those. The 2010 is die cut using my Cuttlebug. You can use chipboards, stickers, cut out printed text or handwritten note, if you want. A few stitching and ribbon finished the front.
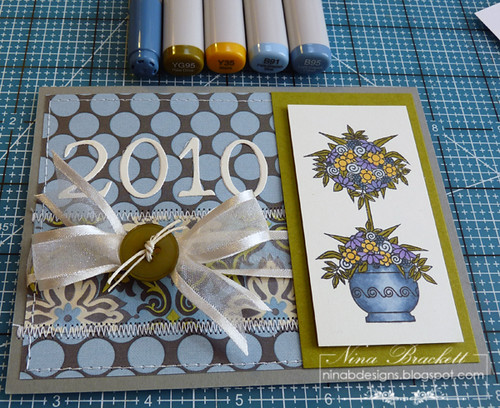 7. Mark the upper part of the front panel, the back cover and the calendar months on the 1.5" and 4" marks as shown. Hole punch where you made the marks.
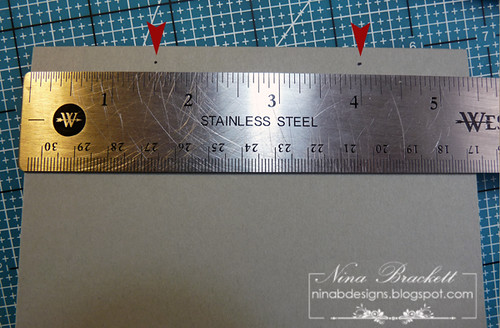 8. Thread string or ribbon through the holes and you're done.
 I found that GinaK's medium clear boxes are perfect to package this. Or if you want to include a few coordinating cards, they will fit easily in the large size. It's sturdy enough for mailing, too.
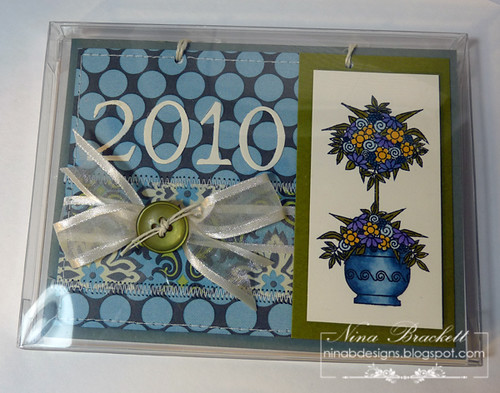
I hope this gives you another idea for gifts this Christmas, handmade and from the heart.


Awesome project, Nina! Love your gorgeous coloring.
ReplyDeleteI love your calendars Nina!! I make calendars every year too and will be using your images!!!!
ReplyDeleteWOW Nina! How totally FABulous!! LOVE these!!
ReplyDeleteWhat a perfect gift! Thank you for the tutorial on how to make these!
ReplyDeleteOh wowza Nina! these both are just awesome! Your coloring so rocks too!
ReplyDeleteLove your calendars Nina!!
ReplyDeleteLove your calendars and the set is so awesome.
ReplyDeleteThese are simply amazing! Great job!
ReplyDeletelove the flip design!
ReplyDeleteWow, what awesome projects - and of course the stamps are the centre piece of them all!!
ReplyDeleteWhat wonderful projects. And your new set is beautiful.
ReplyDeleteGorgeous Nina! And thanks for the templates and instructions. I think calendars are the nicest gifts!
ReplyDeleteHugs,
Lisa
Love these, Nina! Great tutorial too! I love being able to see the entire process!
ReplyDeleteAwesome set, Nina, and thank you for sharing the tutorials!
ReplyDeleteThis is a great idea!! I think I will make my own calendar this year!!
ReplyDeleteThanks for sharing.
God bless
Giovana
Love this...I make calendar pages that fit into a cd case. I'm sure my friends would love a change and this surely is the ticket. Thanks for the aweome tutorials and the link to the free calendar page.
ReplyDeleteWhat a gorgeous Calendar Nina!!!! And ROCKIN' tutorial!!!! I definitely want to try one of these!!
ReplyDeleteOh, I love calendars Nina! These are so beautiful! I will be making some of these for sure!
ReplyDeleteGorgeous calendars, Nina!!
ReplyDeleteAbsolutely gorgeous calendars! Thank you for the tutorials. They are both just amazing!
ReplyDeleteWhoa Chicca These are Fantastic. I love them and thank you so much for the great tutorial and ideas.
ReplyDeleteI really like this project. Thanks so much for taking the time to show how to make it.
ReplyDeleteMy goodness, Nina! How very beautiful and creative! Perfect for gifts!
ReplyDeleteThanks for sharing this!! Great idea, these are fab!
ReplyDeleteHugs,
Vanessa
Great idea, Nina! I love these kind of handmade gifts and yours is fabulous! Thanks for the templates - I'll be sure to add them to the Idea Center later today!
ReplyDeletewhat a fantastic gift idea! Nina, thanks for sharing!! it came out beautiful
ReplyDeleteThese calendars are fabulous Nina. I don't have your set yet but hope to get it soon. I definitely want to make one of these.
ReplyDeleteWow! Your calenders are gorgeous,Nina! What fabulous gifts! Thanks so much for the tutorial on how to make them!
ReplyDeleteNina the calendars are beautiful. I'll definitely be using your tutorial to make some.
ReplyDeleteWow Nina beautiful projects!!!
ReplyDeleteWhat a terrific project and the details are great!
ReplyDeleteNina, I sit here with my chin on the floor, needing to reach down and pick it back up! This is divine! Thank you for sharing the beautiful work that you create!
ReplyDeleteThank you for tutorial!
ReplyDeleteThat is great idea for gift or just like great decoration in the house!
You made great one!
I love your stamps!
Hugs!
Sandra!
wonderful nina!!!!!! Great set and love the calendars.
ReplyDeleteWow! I love your calendars as much as I love your set! Thank you for sharing!!
ReplyDeleteNina! These calendars are amazing! I love them!!
ReplyDeleteThis card so pretty I love the bule and disgen and layout!
ReplyDeleteNina, a great project. Unfortunately, Mediafire says the link is invalid. Is there another link for the calendar pdf file? Thanks
ReplyDeleteHey Nina, I know how much work one of these calendars take.........awesome job!
ReplyDeleteI have given you with a honest scrap awarded........go check out my blog.
Shell~Alaska
SBS28
Nina,
ReplyDeleteYou never cease to amaze me. Your calendars are incredible. as are all your projects. It's something I'm going to give a whirl. What a fabulous job you've done and how kind and thoughtful of you to share with everyone. Thanks so much for all you've done to make the tutorials and share the files with us.
I went to Gina's a day or so ago to post a comment. my fingers and toes are all crossed : )
Beautiful work Nina!
Love love love love love this project!!! I am so going to use this for presents this holiday season!! Thanks for the tutorial!!
ReplyDeleteWhat a wonderful idea to make a desk calendar, Nina ! Certainly appreciate your step-by-step with this! Beautiful color choices and ideas on all your cards with this set !
ReplyDeleteI love your calendars Nina!! I will have to try this, you have inspired me LOL>
ReplyDeleteGreat idea for desk calendar. Thanks for the detailed instruction. I tried to download the calendar template but its no longer attached to the link you provided. Any possibility of sending it to me via email? Thanks.
ReplyDeleteHi Nina, the downloadable calender link isn't working anymore. Could you possibly email me a copy of your file? I would greatly appreciate if you could :) kim.teasdale@yahoo.ca
ReplyDeleteThanks so much!
-Kim
Any chance of you doing this for 2011?? I made a ton of gifts with 2010~~ Again TFS. Can you tell I am perusing your blog... lol
ReplyDeleteI too am wondering if you would consiger doing a 2011 downloadable template. I would LOVE to make these for teacher gifts this year. PLEASE!!
ReplyDeleteGracias por tan bello trabajo ! Dianabel, Panamá
ReplyDelete