Showing posts with label DecoArt. Show all posts

Monday, October 13, 2014

Bright Fancy Pants Cards

***Before I begin, please check out the stamps and dies I have for sale. They're heavily discounted (at least 40% off). The Craft's Meow, GinaK Designs, Layers of Color, Spellbinders and Other Items***

Happy Monday, friends! I hope you had a great weekend. I actually had some down time and was able to craft. I've been playing around with freehand water color painting and really enjoyed learning something new. I hope to make something worth sharing soon. :) 

The Want2Scrap® team is featuring Fancy Pants all month. I love this combo so much that I made at least a dozen cards with many different styles using the same beautiful Fancy Pants Me-ology Collection and Want2Scrap embellishments.

I have to say that my first card is not classically elegant. It also touches on the fun & cute style. The papers, banners, sentiment and birdhouse are by Fancy Pants. Also note that I'm using a non-holiday paper collection for a Christmas card! :)
FP-W2S-Card-6
I adhered the Vintage Fancy Frames and the Sleek Strips 6" Silver Rhinestones along the bottom. I then mounted the birdhouse adorned with Beautiful Blooms in the center. I then covered the with Fences with DecoArt Gesso and adhered on the side. I finished by adding Silver/Clear Rhinestones on the banners and tag.
FP-W2S-Card-6b
For my second card, I made a shabby chic card with lots of stitching, pearls, pretty ribbon, and flowers. I adhered the left over cutout of the Vintage Fancy Frames from the card above and Sleek Strips Pearls under the sentiment.
FP-W2S-Card-7
I used some pretty Mulberry Paper Flower Pink on the seam binding. I finished the card with some Baby Bling Pearls White on the center of the die cut flowers.
FP-W2S-Card-7b
Photobucket

Monday, September 22, 2014

Thanks So Much Mixed Media

I have a mixed media thank you card for you today using some of my Want2Scrap® staples.  I first took a neutral patterned paper and water colored it randomly.  I then stamped the Penny Black’s Floral Applique stamp along the bottom using Clearsnap inks.
PB-Destash-W2S
I covered Want2Scrap’s Nestaboard Labels Eleven (using Spellbinders‘ Labels 11 dies) and Chipboard Clouds with patterned papers, then inked the edges. I painted the Chipboard Houses with DecoArt gesso, then placed a Heart Bling. I adhered them right on the seam. I glued a piece of SRM Sticker doily on the bottom. The sentiment, adorned with Want2Scrap Baby Bling white pearls, is also by SRM Sticker. Finally, I added the corduroy button stringed with burlap twine.
PB-Destash-W2Sd
Challenges: Colour Me...1, Vintage Stamping.
Want2Scrap® Products for Mixed Media Thank You Card:
Other Products:
Photobucket

Tuesday, June 10, 2014

Copper Gear CAS Father's Day Cards

I have a busy few weeks up ahead. We are expecting about 25 guests from America to help with our annual English camp in our little town. I have some posts written that I still need to tweak. In light of the busyness of this time of the year, I may not be able to update my blog as regularly as I would like. But I should be back before the month is over! :)

I have a pair of CAS Mixed Media Cards today for Father's Day.  These are mass producible and show that Want2Scrap® bling works well with masculine cards as well. I started with embossing the white panel with Spellbinders’ Bricks and Bar M-Bossabilities, then I swiped it with two shades of brown Distress Inks, and adhered them to black card bases.
W2S-Fathers-day

I then rubbed some DecoArt Copper Kettle Metallic Lustre on the Want2Scrap Shifting Gears Large Silhouette and cut it in half to use on 2 cards. I intentionally didn’t cover the silhouette completely to show the texture of the paper. I then embellished the round gears with the Nestabling Petite Scalloped Circle Sm Black Rhinestones and Baby Bling Pearls LeCreme pearls.
W2S-Fathers-day4
I added some SRM Stickers on the embossed panel. The sentiment is by Penny Black Hot Rod and stamped using Clearsnap inks.
W2S-Fathers-day3
I adhered the cut gears die cuts using foam squares. Here you can see the layers and many dimensions of the cards, which is made possible by Scrapbook Adhesives by 3L E-Z Runner and foam squares.
W2S-Fathers-day2
I'm entering these to the following challenges: The Pink Elephant (father's day), Crazy for Challenges (masculine), SSS Monday Challenge (use paint); CASE This Sketch; SSS Wed Challenge (masculine).
Photobucket

Monday, May 12, 2014

My First Ever Mixed Media Canvas

I am excited to share with you my first ever mixed media canvas loaded with my favorite Want2Srap® products. I am still new to this new art form and admit that I struggled with the messiness and randomness (as in collages) of it. So, I thought the beauty of art is you can make it personal with your own style. Here is my take of a shabby and "clean and ordered" mixed media canvas. The piece is 5" x 7".
MM-W2S-canvas
The first thing I did was cover Want2Scrap chipboards (Clouds, Houses, Fences) with DecoArt gesso then let them dry. I decoupaged the top half with some torn blue Graphic 45 papers.
MM-W2S-canvas4
The bottom half is covered with burlap, which I secured with a glue gun. I then adhered my different elements: clouds, house, sentiment, fence and Finesse Swirl pearls, which I divided into two parts: one is placed above the fence (photo below) and the other as smoke from the chipboard house chimney (photo above). I adhered a thin pink lace on the fence.
MM-W2S-canvas2
I left the "Love" chipboard as is because it coordinates well with the burlap. I spelled the rest of the sentiment using Authentique letter stickers. I added some Hot Pink pearls to highlight "lives." I also layered "here" with two kinds of letter stickers to make it stand out.
MM-W2S-canvas3
I then die cut several flower and leave templates using Spellbinders dies (Spiral Blossom One and Bitty Blossoms) from various coordinating Graphic 45 pattern papers. I adhered a big rolled flower with a big Hot Pink pearl on the center, along with a strip of lace on the roof, on the chipboard house. The other rolled flowers are glued along the bottom to anchor the whole piece. I also used various Scrapbook Adhesives by3L products on this canvas.
MM-W2S-canvas1
I have made a few more canvases and will share them with you on future posts. I think you will see how quickly I evolved in my mixed media art, from this clean and ordered style to a more eclectic "messy" type. :) The layout is inspired by the Cardabilities #98. I'm also entering this to the Crazy 4 Challenge #235 (Bingo using flowers, sentiment and bling).
Photobucket

Friday, April 18, 2014

Get Well Soon Mixed Media Card and Winner

I have a mixed media card today that uses Distress inks, acrylic paint, embossing, markers, and of course, some lovely Want2Scrap products. I first heat embossed with white ink some Penny Black background stamps (text, music and woodgrain). I blended Distress inks in brown and blue, then squirted a little bit of water. With a pencil, I sketched a tree silhouette and colored that with Memento markers. Because the markers are water-soluble, I was able let the ink bleed a little with a water brush to make it look watercolored.
MM-Tree-card
I then took 3 DecoArt acrylic paints in green blue, peach and white on a plastic palette. Using the eraser end of a pencil on the paints, I dabbed the dots on my tree as you see below. I started with the darkest green, then pink, white with a touch of peach, and finally white. I used the handle tip of a brush to get the smaller dots. I then embellished the dots with some Want2Scrap Le Creme pearls. I painted white on the outline of the Large Bird Flourish Silhouette – Card Sized (2 Pack) before adhering to the card. I then used 72 Count – Teardrop Bling – White Pearls for the wing. The sentiment is by SRM Stickers, which was mounted with Scrapbook Adhesives by 3L Foam Squares.
MM-Tree-card2

I'm entering this card to Curtain Call's challenge. Muse Challenge (sketch), Colour Me #16, Fusion (Photo Insp), SSS Wednesday Challenge. It's been a while since I participated in challenges. And I'm now just finding out some of my favorites have closed shop. But I'm excited to see some new ones have taken their place.

Now, the winner of Monday's giveaway is...Patti P. Please email me via the Contact tab above with the subject, "Lots of Love for Lauryn Winner" so I can spot your email right away in ever-growing inbox. :) Thank you all for joining us in the hop.
Photobucket

Monday, November 25, 2013

Giveaway Winner and a Card

I have a card today that I shared on the Want2Scrap blog a couple of weeks ago. I used my W2S Chipboard house design, which was painted with DecoArt Gesso. You can find more details on the Want2Scrap post HERE.
Want2Scrap-November
And the winner is...Entry # 48 Sabrina R. Please email me (via Contact tab above) with your mailing address and put under subject line "Penny Black Christmas Banners Winner." Thank you all for entering.
a Rafflecopter giveaway

Photobucket

Wednesday, October 23, 2013

Butternut Squash Minions Tutorial

I shared this photo on my Facebook page the other day and it's been one of my most popular posts so far. I guess I'm not alone in my love for these adorable inions.
I enjoyed making them, with the eager help of my 8 year old. Here are the supplies you will need:
Sketch the overalls with a pencil (right squash) and use that as a guide to adhere masking tape on your squash (left). The front and back will look the same.
Apply yellow paint from top of head to the middle, making sure you don't go past the tape where the overalls will be. I did about 3 layers of paint. Let dry for at least 30 minutes.
Remove tape and carefully paint the overalls with blue paint. I used a mason jar to hold the squash that can't stand by itself upside down. I painted 2 coats and let dry again.
Apply Glazing Medium and let dry. I read that you can add this to the actual paint before applying, but I didn't do that. I just wanted a glazed layer before I add the final touches to my minions.
While paint is drying, make your goggles by die cutting or punching circles from thick cardstock or paper coasters. I cut 4 of these per eye. If you don't have either dies or punches, you can print them out and trace onto thick cardstock and freehand cut them.
Glue together 4 layers of the donut-shaped eyes.
 Rub or paint silver paint over goggles. I made 5 of these because one Minion was going to be one-eyed.
Arrange the squash so you can see how they lean. This will decide how you want their faces to look like. I googled minions and found some expressions I liked and sketched them on the squash with a pencil.
 Draw the faces with the permanent markers. Draw the overalls details (pockets, stitches, etc) with the white pen. I filled in the teeth with the white pen as well. After all the drawings are done, varnish your squash and let dry.
Die cut or punch the bigger circle without holes 6 times. Shape one of these into two eyelids. Apply yellow paint and let dry. Draw in the eyelid edges with black marker. Punch 1/2" circles for the eyeballs and scribble a dot with white pen. Assemble goggles as shown.
Wrap the black ribbon around their heads and adhere with sticky tape. Place goggles over ribbon.
My daughter and I had fun making these. I hope you were inspired to make them, too. Please share in the comments if you post your Minions online. I'd love to see!

Photobucket
Follow me on Facebook * Pinterest * Bloglovin'

Tuesday, October 15, 2013

DecoArt Want2Scrap Wall Hanging

The Want2Scrap team has been gifted with some super cool DecoArt products like acrylic paints, gesso, lustre, etc. I would've never thought I'd enjoy these media so much, but I have! I count myself a straightforward card maker, but since I've started dabbling with mixed media, I have enjoyed myself immensely by trying something new. I still have lots to learn, but am glad to be given the opportunity to play with DecoArt's fabulous products.

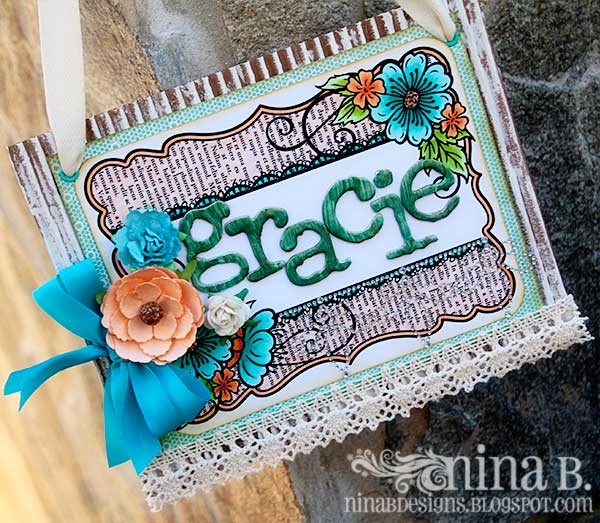
Here's a name wall hanging I made for my daughter. I used the following products for my project.

Want2Scrap Products Used:
DecoArt Products:
Other Products Used:
I first painted gesso on the corrugated cardboard and decorate it with papers, flowers, chipboard letters, lace and Want2Scra bling. To hang it, I punched holes on the upper corners, inserted eyelets, then threaded some twill through.
DecoArt-Want2Scrap-wall-hanging
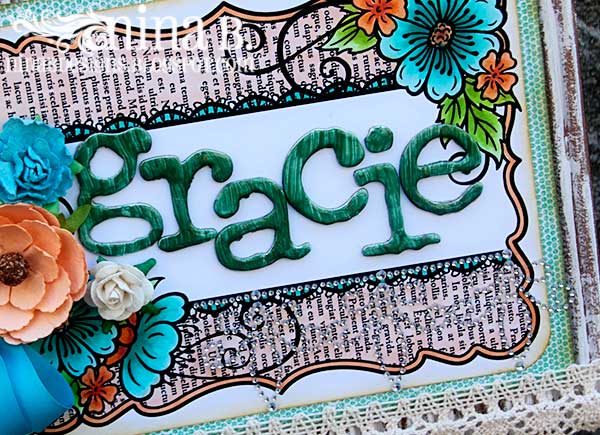
These letters were painted with DecoArt Paper Effects. I love the marbled look.
DecoArt-Want2Scrap-wall-hanging-det
Make sure you check out the Want2Scrap team's beautiful projects on the Want2Scrap blog and be inspired. How would you like to win a pretty cool prize package? Make sure you enter here! 
a Rafflecopter giveaway

Photobucket
Follow me on Facebook * Pinterest * Bloglovin'

Wednesday, September 25, 2013

God's Work Mixed Media Card

Hello, friends! I hope you are enjoying your first few days of fall. Autumn has definitely arrived in Croatia. I love it when the sun is shining but the temps are a little on the cool side (emphasis on LITTLE :). I haven't been much online since I was in a wedding over the weekend, hosted an out of town friend, hosted some more friends, and finished our Christmas cards this year, all 140+ of them. I had very eager little helpers to get me going. :)

My card for today is mixed media inspired. I used my newest TCM Stamps, Chalkboard Faith.  I first colored the background with some Oil Pastels (or crayons would do, if you don't have the pastels), which makes this card perfect for the Moxie Fab Color Media Challenge. I then rubbed them with my fingers to blend. I used DecoArt's Modeling Paste and Want2Scrap's Bare Tree Stencil to create the tree. I let it dry for a few hours.
God-way
Because the quote lines are so close together, I stamped it twice. I cut the banner lines from one of the stamped images, and the others from the 2nd. I highlighted them with some Want2Scrap bling. The tree was decorated with paper flowers. A little bit of Twinery is added before I adhered it to the base.
God-way-det
Here is the stamp set I used. Have a great day!
Photobucket
Related Posts with Thumbnails