
I am so excited to share my latest stamp set today. Vintage Backgrounds is a set I've been wanting to have for a VERY LONG time. It's one of those stamp "staples" that you will use often on your projects for any occasions.
My first card card uses the houndstooth, herringbone and text patterns from Vintage Backgrounds. With this set, you can customize your border or background to your heart's content. The argyle is one of the digi papers in the Bright and Grungy Argyles and the polka dot paper in the smallest flower is from the new Bright and Grungy Dots digi paper pack. The sentiment is from the Spring Has Sprung set.
 I've been enjoying making these paper flowers. The flowers use the herringbone and houndstooth patterns from the set. The tutorial is at the end of this post.
 Here's another card using the herringbone pattern as the background. The paper flower uses the houndstooth pattern and the vintage lace image is used as a border. The butterflies and leaves have the text pattern, also included in the Vintage Backgrounds set. The flower images are from the Spring Mix Stamp TV kit.
 Here's a close up of the flower.
 Here's another card that also uses Asela's Sew Pretty set. I used the text as background for the sentiment and I created a brown border from the houndstooth image. I colored the machine with Copics and swiped it several times with the blender pen to get the retro look I was going for.
 Designers Participating in Previews tonight:
 - Gina Krupsky - Masculine Messages illustrator
- Jessica Fick
- Cathy Tidwell
- Erika Martin
- Emily Giovanni
- Kurtis Amundson
- Lee Murphy
- Lynn Mercurio
- Melanie Muenchinger
- Tami Mayberry
- Theresa Momber
- Geri Utterback - our Center Stage Spotlight Designer!
---------------------------------
Paper Roses Tutorial - I don't claim that this idea is originally mine, but I remember doing this as a kid and this is how I made the flowers on my projects :-).
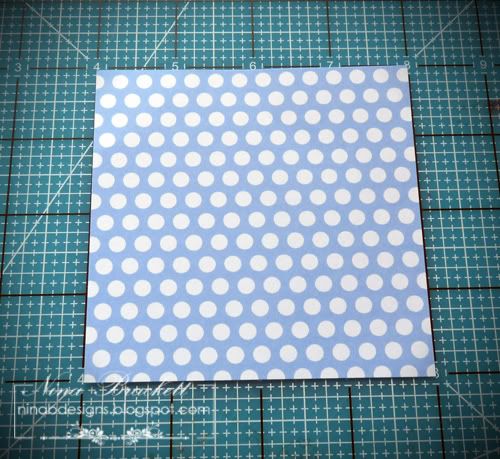
Step 1: Cut a square from patterned paper. I cut a 4" square from one of the polka dot papers from the new Bright and Grungy Dots pack.
 Step 2: Using a pencil, free hand draw a swirl on the back side.
 Step 3: Using the swirl as a guide, cut the paper with decorative scissors (or plain as in my second card sample above).
 Step 4: Curl up the scalloped edge.
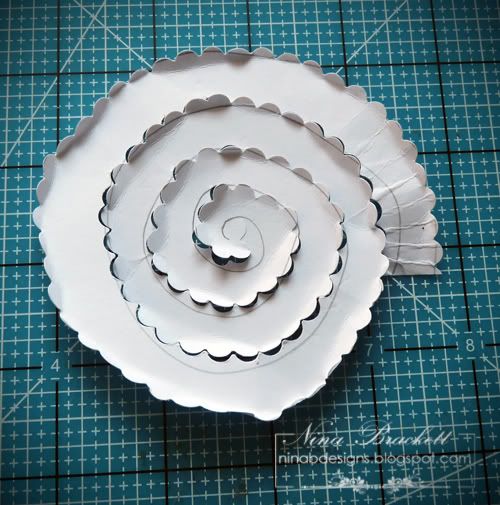 Step 5: Start rolling the strip from the end. Make it as tight as possible.
 Step 6: Unwind as much as you'd like. The looser the roll, the wider the flower will be.
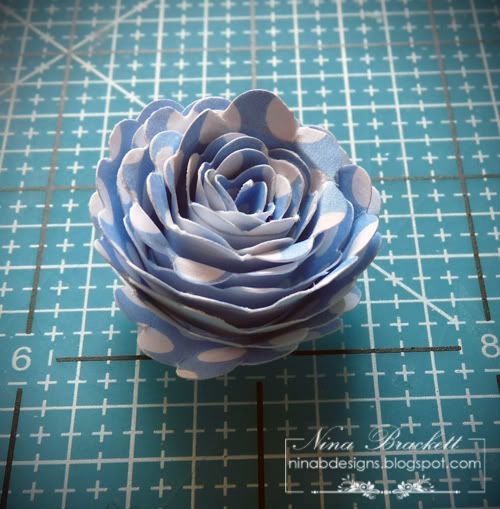 Step 7: Apply glue on the bottom. I found that tacky glue is the best for this technique.Press down and let dry.
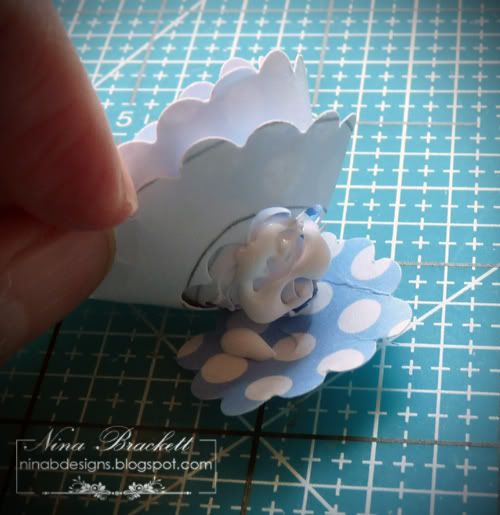 Step 8: For the leaf, cut a small rectangle of paper. I used one with text from the Vintage Backgrounds set on it.
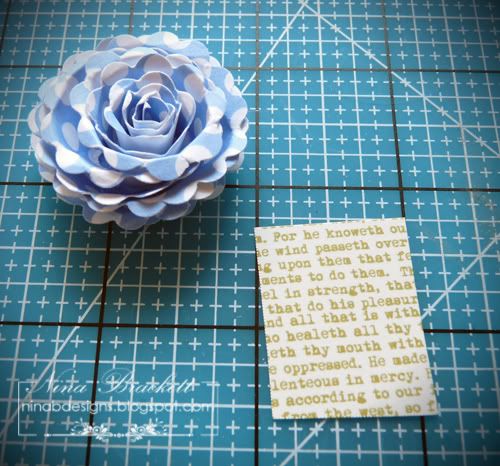 Step 9: Fold paper in half. Cut leaf shape. Adhere to bottom of the flower.
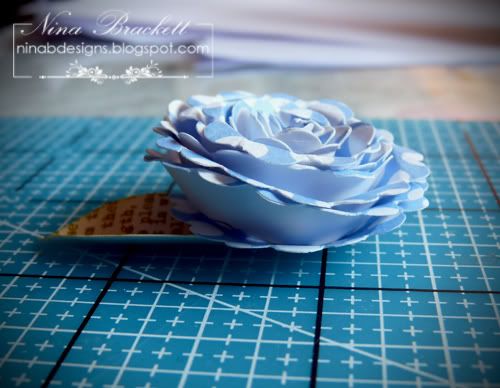
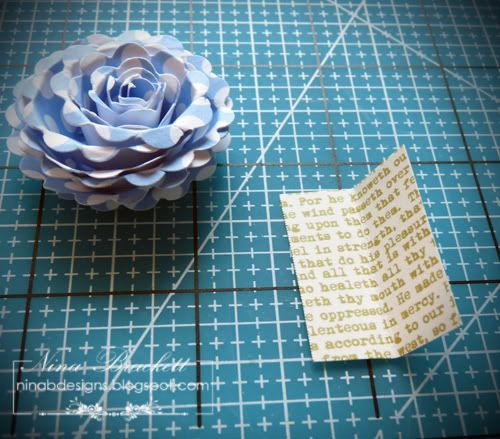 The finished product. I like to put pearls in the center.
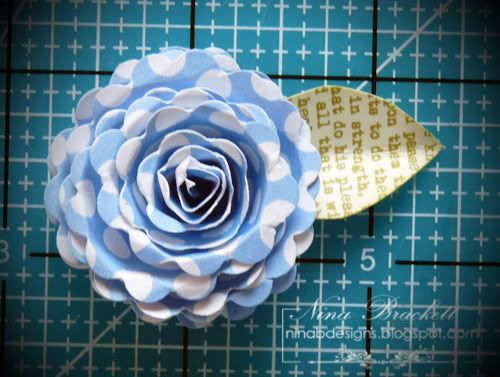
Since we're in the subject of flowers, these cards are perfect for the Stampin' Sisters in Christ challenge going on now!

These are just amazing! I love them all! Thanks for the tutorial too! I want to try these out! Hugs from America!
ReplyDeleteYou are sew clever! Girl I love these flowers!! I wouldn't have thought to use the text on the leaves and butterfly. Wow!!
ReplyDelete~ky
Absolutely awesome use of the backgrounds....I will be using them a lot!!! And thanks for that cool tutorial, I soooo wanna try that!!!
ReplyDeleteThank you for the tutorial on the flower, I'm going to try it. Yours are so pretty. My daughters family is taking a cruise around Italy and Greece in May and one of their stops is Croatia. She showed it to me on the may. So now I now I know where you serve. Blessings
ReplyDeleteAwesome flowers, Nina! I love your new set!!!
ReplyDeleteYahoooo! This is amazing! I can't wait to see your entire set. I love what I have seen so far. AND cute little flower, thanks for the visual. Big hugs!!
ReplyDeleteI love, love your flowers and the Vintage Background set. Your cards are amazing! Thanks.
ReplyDeleteAWESOME cards and AWESOME stamp set!!! That was a great tutorial on the flowers, too! So excited!!!
ReplyDeleteSuper cards Nina! Your new set will be so versatile! Thanks for the flower tutorial. I've made smaller flowers like this using a quilling tool, but have
ReplyDeletenever made a large one - I will have to give it a try!
Nina- beautiful cards! Thanks for the tutorial- I love these flowers!
ReplyDeleteI'm going to love these background stamps!
ReplyDeleteWow your paper flowers are gorgous Nina! Thanks for the tutorial!
ReplyDeleteFabulous cards Nina! I love the flowers, thank you for the tutorial.
ReplyDeleteAmazing cards and I love the tutorial! Thanks for sharing, Nina!
ReplyDeleteWhat lovely cards!
ReplyDeleteOmgoodnesss......such gorgeous cards!!!! Wow!!!! Thx for the fabbie tut!!! I was thinking you used nesties (which I don't own)....so it was a great treat to find out the trick!!
ReplyDeleteGorgeous cards Nina! Love the flower tutorial and will try this!
ReplyDeleteThat sewing machine image is quite special! You rocked it on the shading!
Gorgeous cards, And thanks for the tutorial on these paper roses, they are gorgeous.
ReplyDeleteNina, wonderful cards and a fantastic tutorial!
ReplyDeleteBeautiful cards! And those flowers simply gorgeous! Thanks for the tutorial!
ReplyDeleteok, i LOVE these flowers, and the vintage backgrounds, nina! thanks so much for the tutorial:)
ReplyDeleteWOW - those flowers are amazing! Love the cards you made too.
ReplyDeleteNina, your Vintage Background set is a must have. I am loving what I have seen so far and those flowers are so cool. Thanks for the tutorial, you'll probably seen these popping up everywhere.
ReplyDeleteSuch beautiful cards, Nina. Thank you for creating such beautiful designs for us all to use. I'm so drawn to your artistic style, and always anticipate your sets! Thank you!!!
ReplyDeletefabulous samples and these flowers are adorable, I must try!
ReplyDeleteTFS ypour flowers. Lovely cards.
ReplyDeleteBeautiful cards, Nina! The paper flowers are fantastic! Thanks so much for the tutorial on how to make them! Your new set is a must have!
ReplyDeleteNina, I've waited for soooo long for just such a background set. I can't wait.
ReplyDeleteI've seen a lot of tutorials on making paper roses, this one is one of the best. TFS.
Such gorgeousness Nina! LOVE that flower, will have to give that a try...I remember making those like that too when I was a kid! AND so loving your new set, another winner in my book!
ReplyDeleteWOW!! What beautiful flowers! I can't wait to make one or two or three or a bunch!!! Your tutorial is very easy to follow too!!
ReplyDelete{{HUGS}} from America!!
Oh Nina, the cards and your stamps are AMAZING. Your really know how to showcase them for versatility. I am so thankful for the flower tutorial, I have tried this a few times on my own but never obtained usable results. I'll give it another shot now.
ReplyDeleteJust BRILLIANT! Great tutorial...thanks!!!
ReplyDeleteThese are amazingly gorgeous flowers!!! Thank you so much for sharing your tutorial!
ReplyDeleteJust fabulous cards Nina! Your flowers are so amazing and thanks so much for the flower tutorial, I am definitely trying this very soon :o) Have a wonderful day...
ReplyDeleteWow Nina. Love your stunning creations and beautiful set. Great flower tutorial too. A friend of mine did the same tutorial the other day but i LOVE how you cut the spirals with a scalloped edge. CLEVER. :) LOOKS awesome!
ReplyDeleteFabulous cards, Nina! That is a great way to make the flowers. Easy and not complicated. :)
ReplyDeleteWOW girl! Thank you for the tutorial, these flowers are awesome and I'm certainly giving it a try today! your work is stunning, as always, and the new stamps look so great, that I wish Gina was sponsoring us again! haha
ReplyDeleteAwesome cards and a terrific flower making toutorial! Thank You! :)
ReplyDeleteAdorable card Nina. Thanks to the paper roses tutorial. Ingat.
ReplyDeleteOh Nina! Where do I even begin? Your latest set is absolutely amazing and so versatile! Love that you can create soooo many wonderful projects with it. And your roses are fabulous, I'm definitely CASE-ing and linking back to you!! Wonderful job as always, you never cease to amaze me. ;)
ReplyDeletelove love love those flowers and the background patterns!! gorgeous cards and I am going to try those flowers!!!
ReplyDeleteNina, you make the most beautiful cards! It's always a visual feast when I visit! :)
ReplyDeleteWow!! Stupendous!! Gorgeous papers and flowers, Nina!!
ReplyDeleteHi Nina - what gorgeous flowers - they are perfect for SSIC - thanks for the tutorial, I am going to be making these - I love your cards and your fabulous new set - It is always a pleasure to come and visit you, your work is inspiring! Thanks for playing along with Stampin' Sisters in Christ this week, we would love to see you again! {{{hugs}}}
ReplyDeleteLinda SSIC Design Team
Very interesting tuorial! Simple with a great effect. Thanks for your effort and showing it to all of us.
ReplyDeletewow, nina!!
ReplyDeletethanks so much for the pics!!
I really ♥ the look the scalloped-edge scissors add to these flowers. TFS! :-)
ReplyDeleteWhat a nifty little tutorial, thank you! It creates such pretty flowers, but a lot of it is in the paper choice and you chose some very nice paper to embellish your card. Lovely! Thank you for participating in the Stampin' Sisters in Christ challenge this week!
ReplyDeleteNina, once again a beautiful set and spectacular cards. Thanks for the super tutorial for the sweet flowers. I am so hooked on homemade ones right now. Thanks for sharing everything with us at SSCC.
ReplyDeleteLovely flower, great idea! Thank you for sharing - it is a super tutorial!
ReplyDeleteCardarian
SUPER awesome! LOVE all your stuff--love how you can make these stamps so different--and use several on a card;) LOVE LOVE LOVE it!
ReplyDeleteI saw this done with a quilling tool and a paper punch out. This is very handy if you have neither. Thank you from Western Australia
ReplyDeleteHi! I wanted you to know that I absolutely LOVE LOVE LOVE these flowers!! I was so inspired by this tut that I combined it with another tut to make metal flowers. I basically made YOUR flowers out of metal. I loved how they turned out! You can check them out here: www.theartfulmama.blogspot.com
ReplyDeleteThanks SO much for the wonderful tut and a drop-dead gorgeous blog!!!
xoxooxoxxoox
Susan Chong
beegsmachine@yahoo.com
greate idea, thanks..
ReplyDeleteNina, what beautiful cards! Thanks so much for sharing the floer tutorial. I am going to have to try to make one. I just love the vintage-y look on all of your cards. Thanks for all of the vintage inspiration. Lovely lovely cards!
ReplyDeletethanks you, i love it!
ReplyDeleteI loved it! I´ll try todo! kisses from Brazil!
ReplyDeleteI loved this tutorial flower! I was in need of even a very pretty flower to make a card. Thanks for sharing! Hits!
ReplyDeleteI love flowers. I Loved this tutorial.
ReplyDeleteThanks!
Regina/Brazil
Hi Nina.
ReplyDeleteThanks for sharing this tutorial. I love paper flowers.
Val
www.crieartezzanato.blogspot.com
God Bless You.
Thanks for sharing. Hugs from Slovenia. K.
ReplyDelete