I have a card and a gift box to show you today. First the card...whenever I see snowman images, they immediately make me think of quilts, so I had to make this card :-) (my card for the Winter Wishes preview last month also inspired a quilt). This time I used the cute papers by Cosmo Cricket, Jolly By Golly. The snowgirl was colored with Copics to match the papers. The ribbon is from the Autumn Ribbon Assortment.

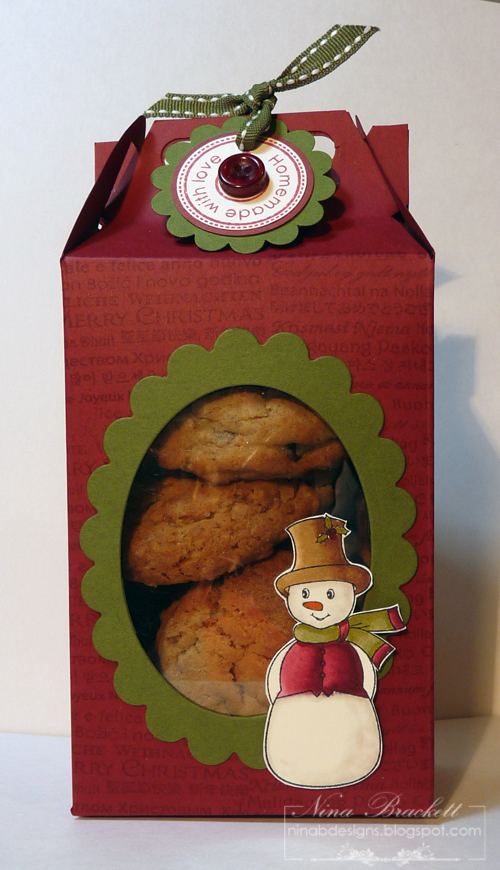
The second project is a gable box, perfect for the holiday gift giving season. I made a template just for today's previews. You can download the Gable Box template >>> HERE <<<. I received a few emails from my last tutorial about problems with the downloads. You can fix this usually by using the latest Adobe Reader. You can see the tutorial on how I made this box towards the end of this post.
 Isn't that snowman adorable? Winter Friends has 11 images and 6 sentiments (and they're not all for Christmas). For my box, I used Cranberry Tart and Fresh Asparagus cardstocks, the ribbon is from the Autumn Assortment and the button is from the Holiday Assortment. The text background is from my new set, Vintage Borders.
Our Center Stage Spotlight Designers joining in the previews tonight. Here are their blog links: Karen Knegten, Sue VanDeVusse.
Then, stop by these GinaK Designers' blog for even more projects with tonight's stamp sets:
Gina Krupksy, Asela Hopkins, Carolyn King, Cathy Tidwell, Cindy Lawrence, Donna Baker, Erika Martin, Emily Giovanni, Jessica Fick, Kurtis Amundson, Lee Murphy, Lynn Mercurio, Melanie Muenchinger, Theresa Momber
Our Release party will be held tomorrow night over on SCS in GinaK's Forum from 7-10 pm CST. We'd love to have you join in the fun! There will be contest questions, challenges, chatter, and lots more samples from our designers throughout the party! See you then!
----------------------------------------------
Gable Box Tutorial: Please click on the images to see a larger view.
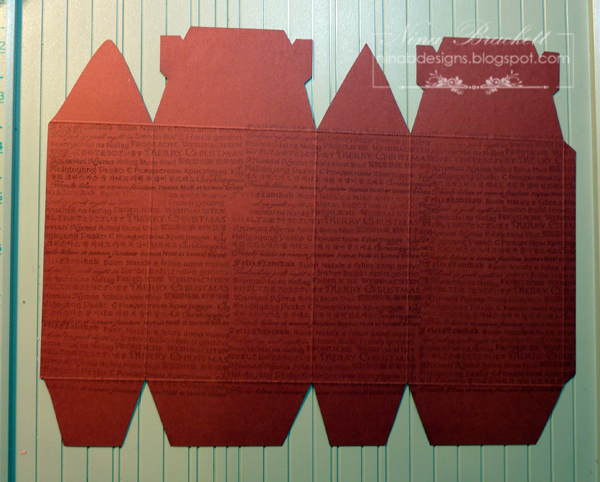
1. Download, print, cut out and score the Gable Box Template. The template image may extend beyond the margins and may not print out completely, but it's okay. I made the template to fill the full page to get the biggest possible box from one sheet of paper. You just need to cut straight to extend to the edge of the page. Stamp the background stamp (I used one of the border stamps from Vintage Borders) on one side of the template. This side will be the outside.
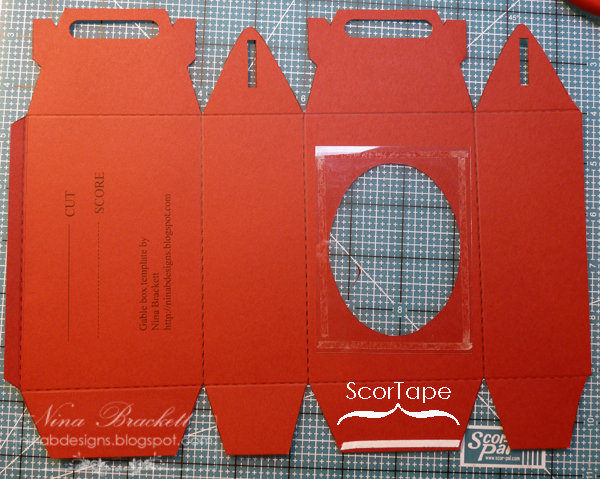
 2. Trace a shape (I used a Nestabilities oval die) on the back side of the box, then cut out using a craft knife. It's okay if it's not perfect. It will be covered on the front later on. Trim a sheet of Graphix Clear crafting plastic sheet to fit around the hole and adhere on the back using Scor tape.
 4. Using the template as a guide, I punched out the handles using Stampin' Up's word window punch. Or you can cut this out with a craft knife.
 5. Put Scor tape on the side and bottom tabs as shown:
 6. Decorate the front. Die cut the scalloped frame as shown. I colored the snowman with Copics. The tag is from the Signed With Love set. I punched it with 1-1/4" circle punch.
 7. Assemble the box. Fill the box with goodies, then attach the tag to the box with a pretty coordinating ribbon.


Adorable quilt card! Love your cookie box----fabulous idea and thanks for the instructions too!
ReplyDeleteFABULOUS Nina!!
ReplyDeleteLove your little cookie box Nina and a great card too...naturally!!
ReplyDeleteLove the quilt card Nina and those cookies inside the cool box!!!!
ReplyDeleteThis comment has been removed by the author.
ReplyDeleteLove the quilt card Nina and those cookies inside the cool box!!!!
ReplyDeleteWow! That treat box is adorable! The cookies look yummy too!
ReplyDeleteGreat card and box Nina! Thanks so much for creating the template for us all!
ReplyDeleteThank you for sharing your wonderful template, Nina! I love what you've done for the Sneak Peeks!!
ReplyDeleteNina, The snowman card is adorable and I love the box! Thank you for sharing the template and tutorial!
ReplyDeleteThanks for the template. Your projects are amazing.
ReplyDeleteYour combination of the fresh asparagus and cranberry tart are incredible. The addition of the snowman makes this a beautiful gift!
ReplyDeleteGorgeous projects! Thank you for the gable box tutorial, have to try that!
ReplyDeleteHugs,
Vanessa
loved the box!!!
ReplyDeleteI love this box!
ReplyDeleteThank you for tutorial!!!
And your card is so cute,love this snowman(for who is that gift he is caring?)lol.
I asked once and I must ask again-girl when do you sleep?
I'm happy if I manage to make one card in day!lol.
Hugs!
Sandra!
FANTASTIC Nina...what a great combination of projects. Your card is adorable...love all the stitching - a great quilt feel to a card with a snowman! And your cookie box is GREAT. I love that you took the time to show us your steps to creating such a great gift.
ReplyDeleteAWEsome Nina! Love you coloring on those snowman and that tutorial so rocks!
ReplyDeleteyour gable bx is the bomb!! i love that with your stamped borders and the snowman!!
ReplyDeleteYour quilt card is darling! Love the stitching and the colors. The PP is wonderful. So pretty Nina
ReplyDeleteAnd your gable box project is terrific. I love the green scallops and the snowman is extra adorable. You've colored it like a Copics master!
Your quilt card is darling! Love the stitching and the colors. The PP is wonderful. So pretty Nina
ReplyDeleteAnd your gable box project is terrific. I love the green scallops and the snowman is extra adorable. You've colored it like a Copics master!
Awesome card and treat box, Nina! I love the papers and stitching on the card! Terrific details and coloring on the box!
ReplyDeleteBrilliant projects!!
ReplyDeleteGorgeous!!! And that snowman on the cookie box - FABULOUS! Colored to perfection!
ReplyDeletelove your cheerful snowgirl card & your snowman treat box looks YUMMY! wish I had some of those cookies right now!
ReplyDeleteOh, what a beautiful snowman card! I love the quilt and all the stitching! I love the cute cookie box! Thanks so much for the tutorial on how to make the gable box!
ReplyDeletethese are so cute! fabulous projects!!
ReplyDeleteLove the box! It is so cute and yummy!
ReplyDeleteSuper cute box, and love the quilted look of the card!
ReplyDeleteThank you so much.
ReplyDeleteA wonderful tutorial, Nina... and such a cute Project! I ordered that sweet Winter Friends set, and qualified for the free with three set. Woo hoo!
ReplyDeleteVery cute card Nina. Love your cookie box. I downloaded the pattern and will working on it. Thanks for sharing the pattern. I just received your new stamp set today and am so anxious to play with it.
ReplyDeleteWhat a fun template!!! I'll have to try it this week. TFS it with all of us!
ReplyDeleteIt is a very nice box - I would have liked to make one myself, but I cannot download the template. Can you help me - it would please me so much.
ReplyDeleteThank you for the tutorial
FABULOUS
ReplyDelete