For Friends with Flair, please scroll down below. Thank you.
I'm excited to show you my newest set from GinaK Designs, Vintage Borders. It's my favorite set so far because it's so versatile and it includes stamp designs that I've been wanting to use on my cards for a long time now.
Make sure you stop by the StampTV Idea Center for more Vintage Borders inspiration.
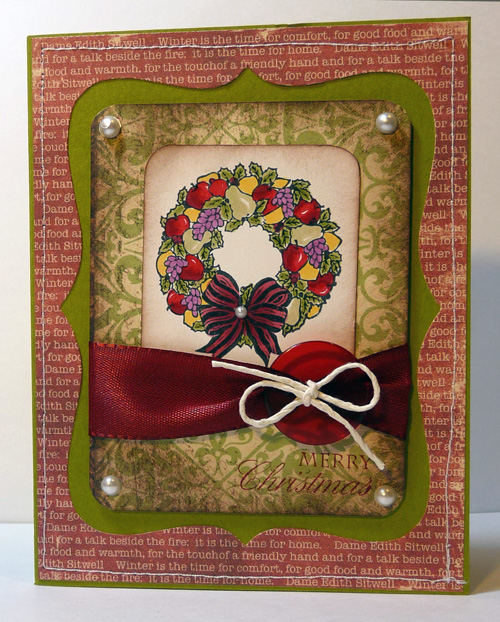
And here is another card using this set. I used Cranberry Tart and Green Apple CS, Memento Rhubarb ink, button from the Autumn Button Assortment and the ribbon is from my stash.
Welcome to UNITY's Friends with Flair Friday. Make sure you check out the list on this SCS thread or Unity's blog for the list of participants this week.
I have two cards to show today using 2 of the 25 stamps I won for being Runner Up in Bro4 challenge. Unity was kind enough to send them directly to Croatia. Thanks so much, Angela!
My first card is a fallish card using one of the Bevy of Butterflies stamps. The background and word border are from my grab brag prize, so I'm not sure which set they're from, but I love them!
My second card uses the Glorious Angel stamp. When I saw this image, I immediately fell in love with it and I knew it's perfect to pair with the musical score stamp from Vintage Borders. I colored the angel with Copics.
And here's a close up so you can see where I highlighted the angel with a glitter pen.
Here we are on our third day of GinaK Designs previews. Today, we are featuring Rupa's new adorable set, Winter Friends and the new Free with Three set (when you purchase 3 sets from the GinaK Designs store, you get this one free from Thursday until the next release), Signed With Love.
I have a card and a gift box to show you today. First the card...whenever I see snowman images, they immediately make me think of quilts, so I had to make this card :-) (my card for the Winter Wishes preview last month also inspired a quilt). This time I used the cute papers by Cosmo Cricket, Jolly By Golly. The snowgirl was colored with Copics to match the papers. The ribbon is from the Autumn Ribbon Assortment.
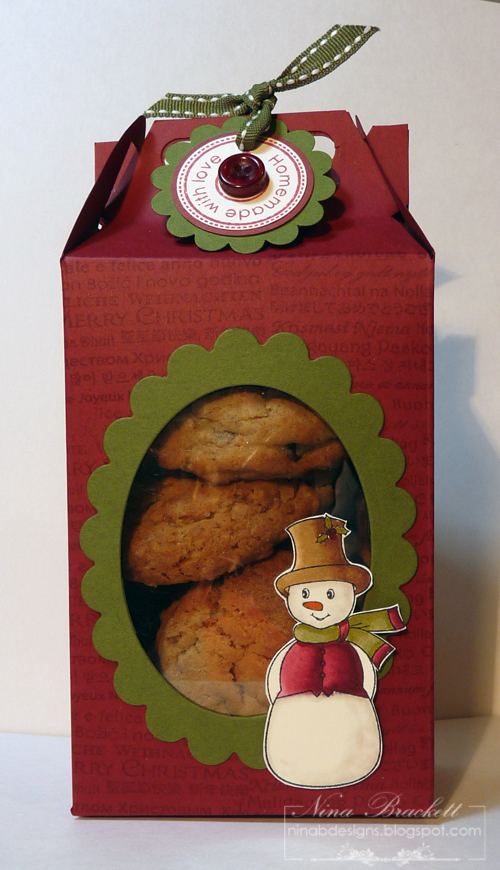
The second project is a gable box, perfect for the holiday gift giving season. I made a template just for today's previews. You can download the Gable Box template >>> HERE <<<. I received a few emails from my last tutorial about problems with the downloads. You can fix this usually by using the latest Adobe Reader. You can see the tutorial on how I made this box towards the end of this post.
Isn't that snowman adorable? Winter Friends has 11 images and 6 sentiments (and they're not all for Christmas). For my box, I used Cranberry Tart and Fresh Asparagus cardstocks, the ribbon is from the Autumn Assortment and the button is from the Holiday Assortment. The text background is from my new set, Vintage Borders.
Our Center Stage Spotlight Designers joining in the previews tonight. Here are their blog links: Karen Knegten, Sue VanDeVusse.
Then, stop by these GinaK Designers' blog for even more projects with tonight's stamp sets:
Our Release party will be held tomorrow night over on SCS in GinaK's Forum from 7-10 pm CST. We'd love to have you join in the fun! There will be contest questions, challenges, chatter, and lots more samples from our designers throughout the party! See you then!
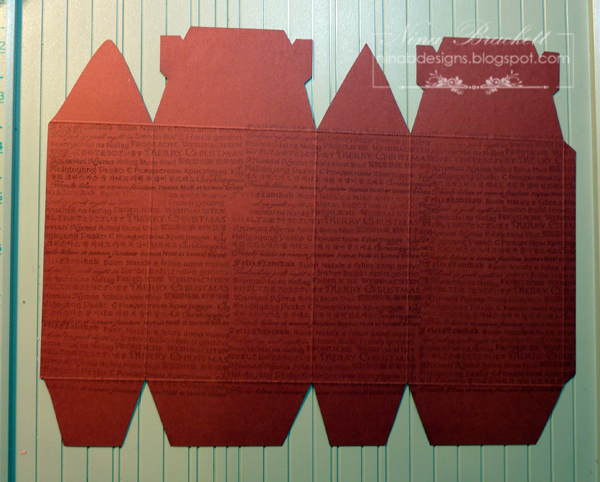
---------------------------------------------- Gable Box Tutorial: Please click on the images to see a larger view.
1. Download, print, cut out and score the Gable Box Template. The template image may extend beyond the margins and may not print out completely, but it's okay. I made the template to fill the full page to get the biggest possible box from one sheet of paper. You just need to cut straight to extend to the edge of the page. Stamp the background stamp (I used one of the border stamps from Vintage Borders) on one side of the template. This side will be the outside.
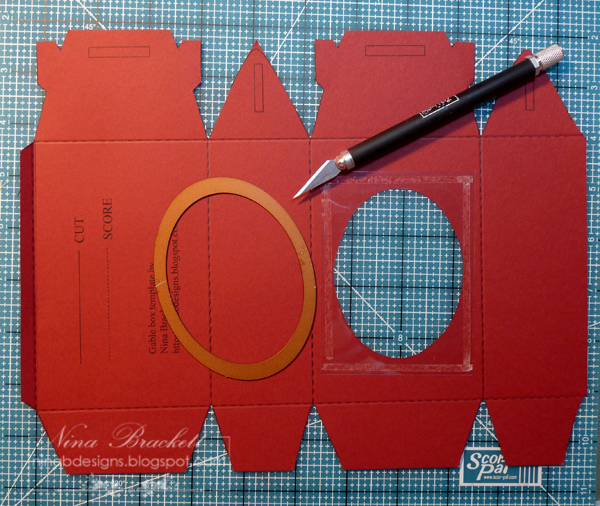
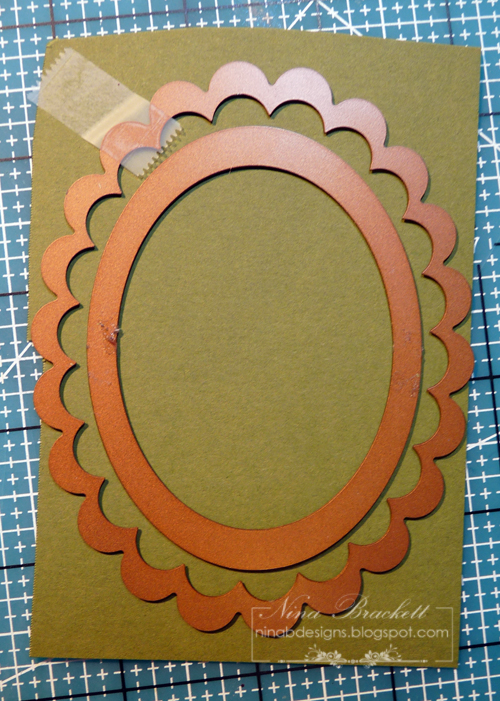
2. Trace a shape (I used a Nestabilities oval die) on the back side of the box, then cut out using a craft knife. It's okay if it's not perfect. It will be covered on the front later on. Trim a sheet of Graphix Clear crafting plastic sheet to fit around the hole and adhere on the back using Scor tape.
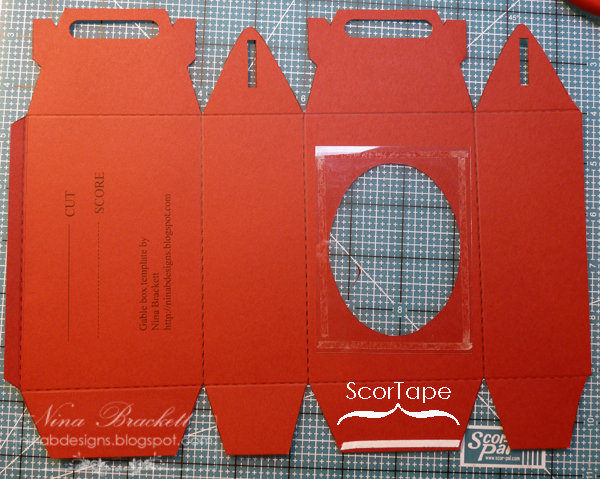
4. Using the template as a guide, I punched out the handles using Stampin' Up's word window punch. Or you can cut this out with a craft knife.
5. Put Scor tape on the side and bottom tabs as shown:
6. Decorate the front. Die cut the scalloped frame as shown. I colored the snowman with Copics. The tag is from the Signed With Love set. I punched it with 1-1/4" circle punch.
7. Assemble the box. Fill the box with goodies, then attach the tag to the box with a pretty coordinating ribbon.
Welcome to the second day of GinaK Designs previews. Today, we will be showingAsela Hopkins'First Christmas set and my new Vintage Borders set.
For the first card, I stamped the musical score stamp from Vintage Borders with Vivid Olive on Soft Sand CS. I stamped the cardinal image from the First Christmas set directly on the card front. The pine needles were colored with Memento Cottage Ivy, the bird with Copic. Other supplies used are a button from the Holiday Button Assortment and the red organdy sheer ribbon. I scored a few lines on the bottom for added effect. You can click on the images for a larger view.
This next uses the cute bear from the set. I colored it with Copics and mounted with foam tape on this girly Christmas card.
The next cards feature my new set, Vintage Borders, which has 10 images: 1 sentiment, 1 verse and 8 border images that you can stamp side by side to create longer borders. Five of the border images are not specific for Christmas, so you can use this set all year as well. These border stamps are also great to make your own backgrounds, as seen in the first card and below.
This is a clean and simple card with a fun, eclectic background that's easily mass produced.
The monochromatic cards below are also easily mass produced. The ornaments were stamped three times to create the longer border, then colored with different shades of the same color Copic markers. The "peace" sentiment is my own handwriting and is one of the stamps in Vintage Borders. The scallop border is also from this set (you saw this from yesterday's post).
Our Release party will be held Thursday night over on SCS in GinaK's Forum from 7-10 pm CST. We'd love to have you join in the fun! There will be contest questions, challenges, chatter, and lots more samples from our designers throughout the party! See you then!
I am so excited to begin the previews for Thursday's releases. I know you will love every single one of the new GinaK Designs stamps. For today, the GinaK team is previewing Melanie's newest set, Festive Frame. It has a beautiful frame image and several holiday sentiments to fit inside the oval center.
I colored the image with Copic markers and used the Stardust Pure Glitter Pen to add the lines, highlights on the flowers and swirls inside the oval. It's my new favorite tool. I love how easily it flows out and the results are amazing, even though it's hard to see clearly in a photo. You will be seeing more of this pen in the next few days.
This card measures the typical 4.25" x 5.5", but the card base is only 4" tall. I wanted to extend the frame outside of the card base to make an interesting dynamic to the card. The scallop border is a preview of my new set, which we will show tomorrow. I used Cranberry Tart, All Spruced Up and White cardstocks, button from the Holiday Button Assortment and sheer ribbon.
For even more inspiration tonight, please visit the Illustrator of the Festive Frame stamp set Melanie Muenchinger's blog. Then, check in on our CenterStage Spotlight Designer, Diana Queen who has prepared a project for us tonight too.
The GinaK Designs Release party will be held Thursday night over on SCS in GinaK's Forum from 7-10 pm CST. We'd love to have you join in the fun! There will be contest questions, challenges, chatter, and lots more samples from our designers throughout the party! See you then!
I hope you can play along with this color challenge at StampTV. A winner is picked randomly to win a GinaK Designs stamp set valued at $24.95 or less. You have until next Monday, Nov 2, at 8AM CST to upload your project on StampTV with the tag STVCC36.
And beginning tonight at 10PM CST, the GinaK Designs team will be previewing the new stamps being released on Thursday. I can't wait to show you. I love every single one of them.
My second card is from the CardPatterns' sketch challenge this week. Here's the sketch: I flipped the sketch for my card:
The sponsor this week is Sherrod Studios. Isn't that image adorable? The random winner will win 1 Stamp Set of his/her choice ($15.00 worth). They are also offering a free shipping promo until Nov 1st. I hope you can join us this week at CardPatterns.
Welcome to Friday Friends with Flair. I have two things to show you today, but first, make sure you check out Unity's blog to get the list of participants this week. And find the flair for a chance to win a grab bag of stamps.
Card #1 is a Thanksgiving card that uses the elegant stamp from the Aug09 KOTM: Following My Heart kit to make a background pattern with Vivid Olive ink. The quote is from Something Within. I colored the pearls with Copic R89 to match the papers and doodled the dots on the scalloped border using a white gel pen.
Card #2 is a simple Christmas card that can be easily mass produced. I stamped various images from the Stylin' Stars kit and the sentiment from Feel the Joy. I then used my Sakura glitter pen to draw the strings and ribbons. The sparkly elements are hard to photograph, but they are so pretty and so simple to do, too. A button with silver cording on the side finished the project. The card base is Soft Sand.
Welcome to the Warm Winter Wishes blog hop. Not only is this set adorable, but 100% of the proceeds from its sale benefits the Alzheimer's Association. This cute set was illustrated by the fabulous Carolyn King.
GinaK will be giving away a copy of Warm Winter Wishes on her blog tonight - so pop over there to leave your comment on her blog for your chance to win the set for free! (If you've already purchased the stamp set, we can swap it out for another GinaK stamp set valued at $19.95 or less.)
Here are some cards with ruffles for the current Moxie Fab Challenge. I love this new challenge. I'm posting a quick one as I have to prepare for guests and lots of birthdays (3 to be exact) to celebrate this week in our family. I have the stamps used listed, but will post the rest of supplies later, if anybody's interested. Thank you and have a good day!
Stamps used: Garden Delights (Indinkado), Trendy Trees (SU)
Stamps used: A Very Merry Christmas and Holiday Cheer (GinaK Designs)
Stamps used: Lord of the Season, Elegant Verses (GinaK Designs)
Stamps used: Lord of the Season, Many Wishes (GinaK Designs)
I am so glad you joined us today featuring my new stamp set, Lord of the Season. Since the gift-giving season is upon us, I thought I'd share two projects with you using this all occasion set - one that takes a little bit more effort and another that can be easily mass produced.
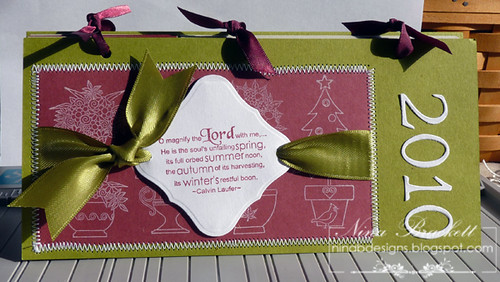
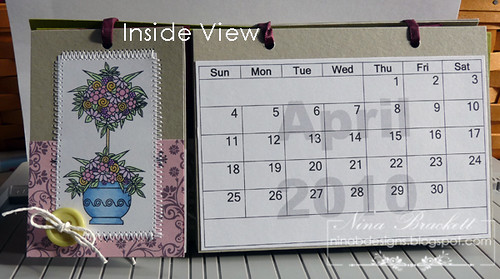
Lord of the Season is a perfect set to make handmade desk calendars with because each season is represented with a topiary image. I made about 50 handmade calendars last year and I think i might do it again this year. First is one that I will make for hostesses or dear friends and family, who enjoy handmade gifts. It takes about an hour to make, so this may not be ideal for mass production.
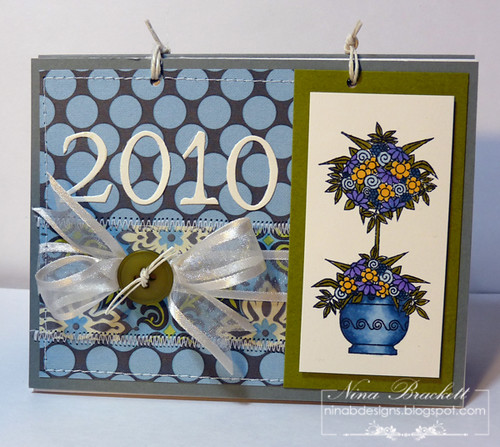
Long Desk Calendar. I used Green Apple, Cranberry Tart, Soft Sand, PL White cardstocks. You really need to use good quality, thick cardstock for the covers, so the calendar can sit well on your desk, especially when you put a lot of embellishments on it. Click on the photos for a larger view.
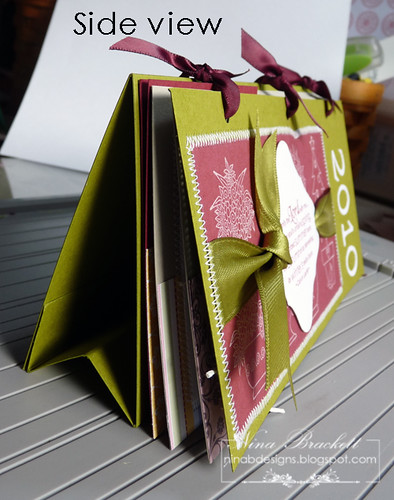
Look how well it stands with GinaK's Green Apple for covers.
And the rest of the stamped images inside:
The patterned papers I used are digital papers from GinaK Designs: Bug Me Anytime Pastel, Vintage Holly, and Grungy Elegance packs. I colored the images with Copics and stitched around. A simple stringed button embellished each one.
In order to make this, I created a Calendar Template that you can download >>>Calendar Template HERE<<<. And you can download the tutorial on how I made this >>>Calendar Tutorial HERE<<<.
Desk Calendar for Mass Production. I designed the second calendar so you can make a few in an hour. This also uses the Calendar Template. The tutorial on how I made this is found towards the end of this post. Not only is this super easy to make, it is also economical. It uses 1 sheet heavy weight cardstock ($0.30), 3 sheets of layering weight paper ($0.62), string, ribbon ($0.25), button and scraps of paper. The total amounts to less than $2 a piece and the result is beautiful and lovingly handmade by you. Click on the photos for a larger view.
Please scroll below to read how I made this calendar.
If you make either calendar, please leave me a comment so I can see. And if you want to have a chance to win this set, leave a comment at Gina's blog.
For even more ideas with my Lord of the Season stamp set, visit the blog links below, as well as the GinaK Idea Center here: Lord of the Season.
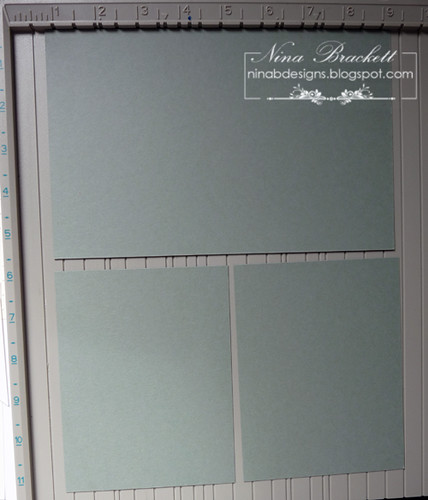
2. Cut the full sheet of heavy weight cardstock in half and cut one of the halves in half, as shown. I used Moonlit Fog.
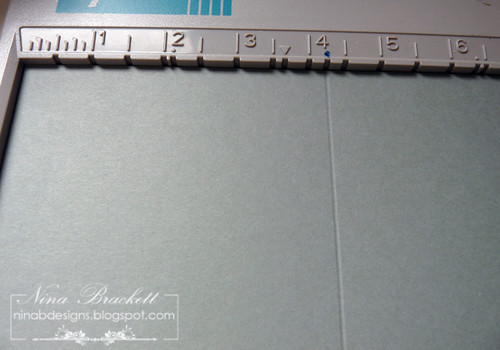
3. Score the half cardstock at the 4.25" mark and one of the quarter panels at 2.125," then fold. My ScorPal comes in handy for this step.
4. Put strong adhesive on the edges of the folded half sheet. I used Scor tape.
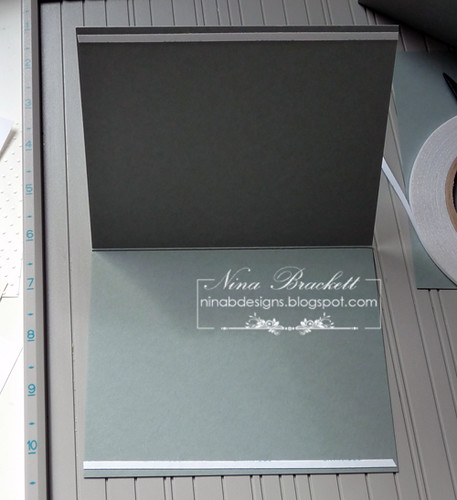
5. Adhere both folded panels as shown.
This is what you should have now.
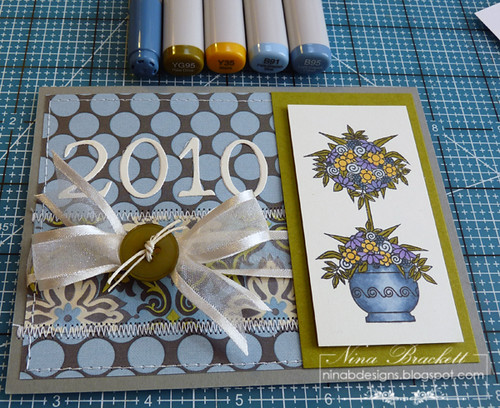
6. Now, you're ready to decorate the front panel. You can make this as elaborate or as simple as you'd like. I stamped my topiary and colored it with Copics. I found scraps of paper and used those. The 2010 is die cut using my Cuttlebug. You can use chipboards, stickers, cut out printed text or handwritten note, if you want. A few stitching and ribbon finished the front.
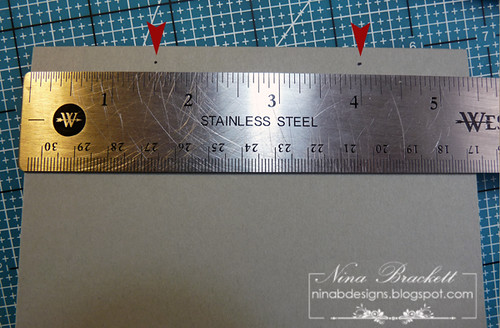
7. Mark the upper part of the front panel, the back cover and the calendar months on the 1.5" and 4" marks as shown. Hole punch where you made the marks.
8. Thread string or ribbon through the holes and you're done.
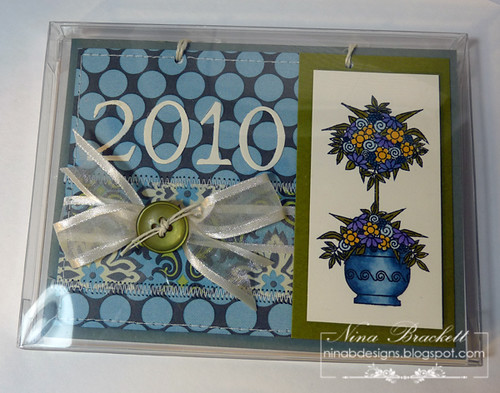
I found that GinaK's medium clear boxes are perfect to package this. Or if you want to include a few coordinating cards, they will fit easily in the large size. It's sturdy enough for mailing, too.
I hope this gives you another idea for gifts this Christmas, handmade and from the heart.

 Make sure you stop by the StampTV Idea Center for more Vintage Borders inspiration.