Thank you so much for your kind comments from the announcement I made yesterday about changes with my design work. Your support and encouragement mean so much to me. I will have some new exciting things coming up, so I hope you'll continue to stop by and visit me on my little blog :-).
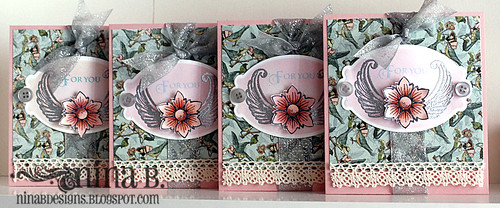
As soon as I saw Moxie Fab's Card Set challenge, I knew I had to enter. I love making card sets and make them often. They make great gifts, don't you think? The colors on my card set were inspired by the Play Date Cafe's colors of pink, blue and silver - a challenge for me, but I'm glad to have these Graphic 45 Once Upon A Springtime papers to get me started. The sketch (mini cards) is by Waltzingmouse Sketch Challenge #41 (my cards are 4.25 x 4.5").
I used some of my favorite Layers of Color's sets: Nature Walk (flower, which was colored with Copic markers), Regal Wings (wings), Sent with Love (card sentiments), Happy Wishes (box sentiment). I die cut the focal image with Spellbinders Labels 10 and adhered it slightly curved.
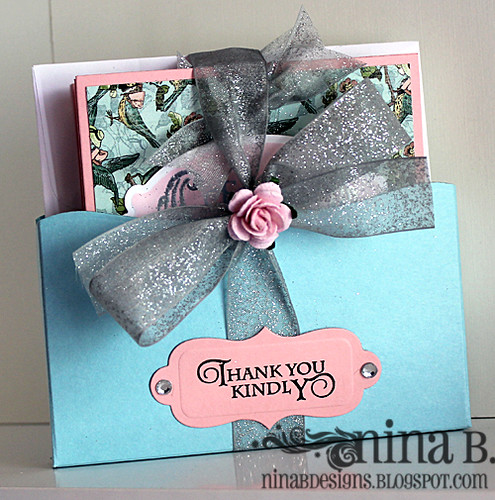
And here is the box I packaged it in. This set will be a gift for a good friend.As soon as I saw Moxie Fab's Card Set challenge, I knew I had to enter. I love making card sets and make them often. They make great gifts, don't you think? The colors on my card set were inspired by the Play Date Cafe's colors of pink, blue and silver - a challenge for me, but I'm glad to have these Graphic 45 Once Upon A Springtime papers to get me started. The sketch (mini cards) is by Waltzingmouse Sketch Challenge #41 (my cards are 4.25 x 4.5").
I used some of my favorite Layers of Color's sets: Nature Walk (flower, which was colored with Copic markers), Regal Wings (wings), Sent with Love (card sentiments), Happy Wishes (box sentiment). I die cut the focal image with Spellbinders Labels 10 and adhered it slightly curved.
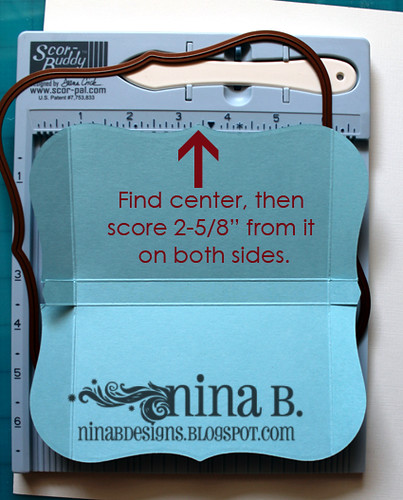
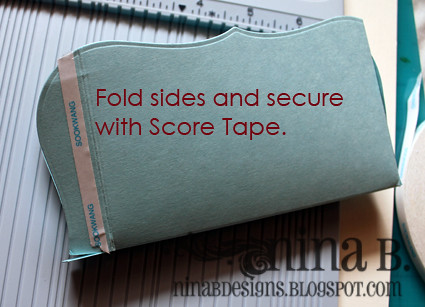
I posted another card set in a box a few days ago and I received many inquiries about how I made that box. Here's a short tutorial on how I made the card box. The only difference is I used the Grand Nestabilities Labels 4 for that one and Labels 1 for today's box. A ScorBuddy will come in handy when mass producing these card sets.
My envelopes were 5" x 5", so I scored the box at 2-5/8" on both sides. You can adjust that, of course, depending on the size of your envelopes. Add about 1/4" to the width of your envelope.
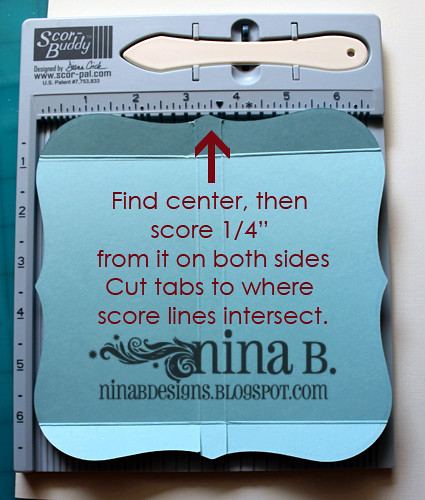
You can also adjust the measurements below, depending on how thick your stack of cards and envelopes are. Keep in mind that when your cards are bulkier, you may need to make the score lines farther apart.
I hope you find that helpful. Have a great day!


FAB card set Nina...soooo pretty and I love the packaging! Thanks for the tut!
ReplyDeleteGorgeous set Nina! I looove the design and that package is perfect! Awesome!
ReplyDeleteYour cards are beautiful! What a fantastic gift this would be! Thanks very much for the inspiration Nina!...Nancy :o)
ReplyDeleteGorgeous!!! Thanks for the great tutorial!
ReplyDeleteWow this card is beautiful and I love that package. Thanks for the tutorial.
ReplyDeleteThese are stunning.
ReplyDeleteThese will surely make a lovely gift set.
ReplyDeletesuch a lovely gift idea, nina! thanks for the tut--i'll try this box:)
ReplyDeleteOh my WORD, these are pure loveliness! The paper, shimmery ribbon, and lace make for a perfect combination. I love the little wrap that you made to hold them!
ReplyDeleteBeautiful cards Nina, and thanks for the tutorial :-)
ReplyDeleteBlessings
Maxine
LOVELY set Nina!!!! Thanks so much for joining us at The Play Date Cafe:)
ReplyDeleteWow, Nina...those are some gorgeous cards and what a lovely organizer! You are so incredibly crafty! Thanks for playing along with us at the Play Date Cafe!
ReplyDeleteJust gorgeous! What a wonderful set of card and the way you packaged them is just dreamy! Thanks for playing with us at The Play Date Cafe!
ReplyDeleteWhat a wonderful gift idea. Everyone needs thank you cards and these are so beautiful. Love the paper and colors. Thanks for the tutorial.
ReplyDeleteMarcie
These are beautiful cards, Nina, and I love the little sleeve you made for them! Thank you for sharing your talent with us this week at Waltzingmouse Sketch Challenge!
ReplyDeleteSuch beautiful cards - love the colours. I think the little gift case is super. Thanks for the tutorial!
ReplyDeleteOh this is simply beautiful Nina! LOVE everything about it! Thanks for the tutorial, I will have to have a play! Thanks for playing along with us at the Play Date Cafe this week!
ReplyDeleteGorgeous card set, Nina! I love the design and the wonderful sleeve to hold them! Thanks for the tutorial!
ReplyDeleteNina, you are such a rock star! I love everything you do. Thanks for playing with us at the Play Date Cafe, so we can have your beauty hanging there. :)
ReplyDeleteWhat a gorgeous, little, gift set! Your packaging is just as pretty as those beautiful cards themselves! Thank you so much for playing along with us this week at The Play Date Cafe!
ReplyDeleteOH, Nina--I just loooooooooove this card set! AMAZING! Love the tutorial too! You knock my socks off--beautiful ribbon! You always have the most amazing supplies and creations! LOVE LOVE LOVE! THANK YOU THANK YOU THANK YOU--Thank you so much for playing along with us over at the PDCC!
ReplyDeleteBeautiful note cards & fantastic carrier!
ReplyDeleteFantastic box and GORGEOUS cards, Nina. You rock! Glad you had time for participating in the Waltzingmouse sketch challenge!!!
ReplyDeleteNINA!!! This is a stunning set! We are so happy you had time to play with us and that you enjoyed the colors from The Play Date Cafe. I have no doubts you will be recognized for this set again and again! Great to have you!
ReplyDeleteFabulous set Nina! I love this and the great tutorial! I'd like to invite you to a LOC tea party I'm throwing on Sat. on my blog! :) Join me for high tea! Will be praying for you on whatever the Lord has ahead for you and your design work! I know He's given you your talent and abilities and you will use them for Him!
ReplyDeletehugs,
grace
I am loving your work. Just beautiful, & inspiring. Thank you.
ReplyDeleteHey Nina! Thanks for linking these up to the Card Set Challenge in the Moxie Fab World in celebration of 350 Cards & Gifts Week! Moxie fab! :)
ReplyDeleteFantastic, Nina! What a wonderful gift! Thank you for the easy tutorial!
ReplyDeleteHugs!
Nice job, Nina!
ReplyDeleteWhat a fancy set of cards!!! Excellent job :)
ReplyDelete